Adding custom user attributes to JWT tokens with Auth0
Overview
Most authentication and authorisation platforms are capable of generating JSON Web Tokens(JWTs) which is an open standard (RFC 7519) that defines a compact and self-contained way for securely transmitting information between parties as a JSON object[1]. However in most cases these platforms have their own predefined formats of JWT which might not always match our requirements. In such situations we may need to inject some additional attributes required by our applications to these JWTs so that we can extract them in inside our applications.

In this post I am going to walk you through how you can add custom user attributes (profile attributes) to the users created in the Auth0 platform[2] (which is a authentication and authorisation platform) and how we can reflect those attributes as custom claims in the JWT token.
Let’s Get Started
Setting up an Account and an OAuth Application.
- Go to this URL[3] and create a personal account with Auth0.
- Next we need to create an Application. Select the type as “Machine to Machine” and provide an application name.

3. Next we need to authorize the new application which we created to the management API. For that under the APIs tab of your created application, select the Auth0 Management API from the drop down list and select all the scopes. Next click on Authorize

4. Next go to the application’s settings tab. Specify a callback URL under “Allowed Callback URLs”. We need this step since we will be retrieving the JWT token via the browser, the token will be returned back to this URL once the request is authorized. In my example I have specified it as “http://localhost:8095/playground2”
5. Under Advanced configs of this same page, select implicit also as a grant type.

6. After all this is done, save the changes. Verify that all your changes have been saved correctly.
Creating a user and setting the user attributes.
- In the left menu of the Auth0 dashboard, click on the “Users and Roles” option. Select “Users”.
2. Create a new user by providing a email username and password. Remember the credentials since we will be needing this user to login in order to get the JWT token
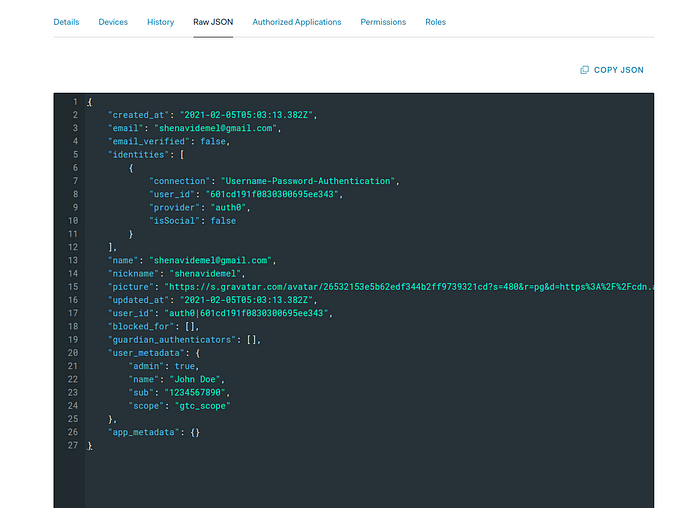
3. Once the user gets created, you will be redirected to the user’s profile page. Scroll down until you see a section called “user_metadata” under the Metadata section. Paste the below JSON content there and save the changes.
{“admin”: true,“name”: “John Doe”,“sub”: “1234567890”,“scope”: “gtc_scope”}

In this example we will be mapping the scope attribute of the user’s profile to a custom claim in Auth0. We can see how this is done in the next section.
4. If your changes are saved, when you go to the “Raw JSON” tab in the user profile page, you should see something similar to the below image with the user’s metadata updated.
Setting up the custom claim
- In the left hand menu of the Auth0 dashboard, select the option “Rules”
- Next click on “Create Rule” to create a new rule.
- Click on “Empty Rule” since we will be adding our own implementation here for the custom rule which will be our scope attribute specified in the user’s metadata.
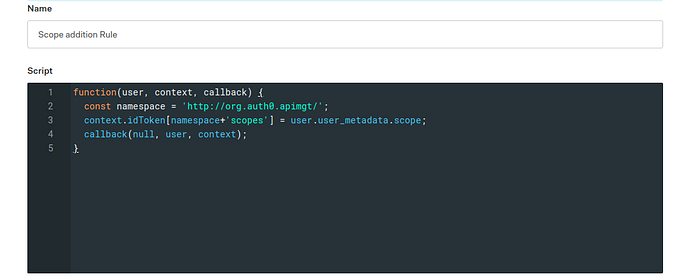
- Give the name for this rule as “Scope addition Rule”.
- In the script section paste the below script content. Here we will extract the scope attribute value specified for the user’s metadata and store it in this specific claim of the JWT token. Note that for such custom claims it is mandatory to define a namespace as well.
- paste the below content in the script section
function(user, context, callback) {const namespace = ‘http://org.auth0.apimgt/';context.idToken[namespace+’scopes’] = user.user_metadata.scope;callback(null, user, context);}
7. After saving the changes the rule should look like the below image.
Obtaining the JWT token
- Go to the “Applications” option from the left menu and select the application which you created. Go to the settings page of your application.
- Copy the clientID from this page.(I will refer to this as the CLIENT_ID).
- Copy over the callback URL which we specified before. (I will refer to this as the CALLBACK_URL)
- Expand the “Show Advanced Settings” option and navigate to the endpoints tab. Copy over the authorize endpoint URL(I will refer to this as the AUTH_EP). (eg: https://dev-lpe6uru2.us.auth0.com/authorize)
- Next in the API’s tab click on the “Auth0 Management API”. Copy over the value of the identifier under the General settings. (I will refer to this as the AUDIENCE_URI) eg: https://dev-lpe6uru2.us.auth0.com/api/v2/
- Once we have these values copied with us we can now construct the complete authorization URL. Construct the below URL using the values which we copied above.
<AUTH_EP>?client_id=<CLIENT_ID>&redirect_uri=<CALLBACK_URL>&response_type=id_token&scope=openid%20profile%20email%20profile&state=state&nonce=nonce&audience=<AUDIENCE_URI>
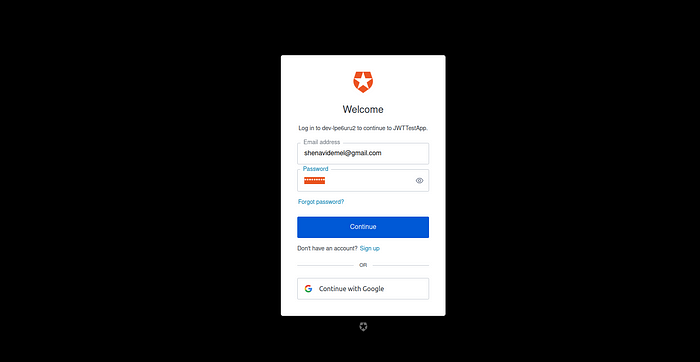
7. Paste the above URL on your browser window. This will prompt for you to login and authorize this application. Login with the user which you created before.
8. You will be redirected to your callback URL with the JWT token stored in the “id_token” parameter. Copy over this value. We are going to inspect this through a JWT decoder.

9. Go to the URL jwt.io and paste this token. In the decoded window you will be able to see the scope attribute of this user is successfully set to our custom claim in the JWT token.
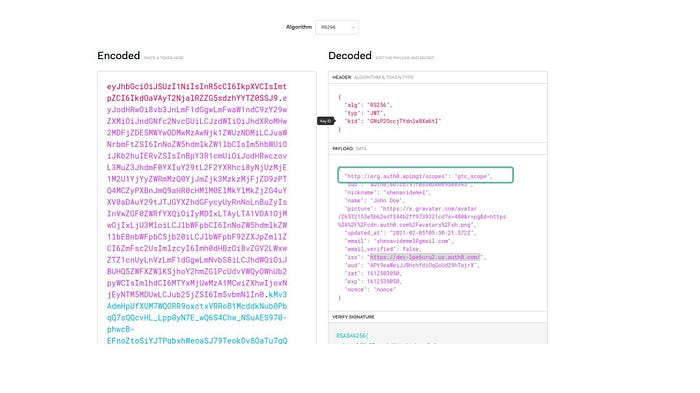
There you have it. You can do the same for different user attributes which you want to send through your JWT to your applications simply in this manner. Add them to your user’s metadata and retrieve it using predefined rules.